
آموزش ساخت فرم ثبت نام و ورود با احراز هویت فایربیس
- دسته بندی:
- تاریخ انتشار: شهریور ۱۶, ۱۴۰۲
آموزش ساخت فرم ثبت نام و ورود با احراز هویت فایربیس
اسم آموزشی که قرار میدم براتون ویدیو این آموزش نیز رکورد شده و میتونید در انتهای این پست در کانال یوتیوب ما مشاهده کنید
در آموزش ویدیوی که در یوتیوب قرار دادیم با استفاده از هوش مصنوعی چت جی پی تی این فرایند رو پیاده سازی میکنیم
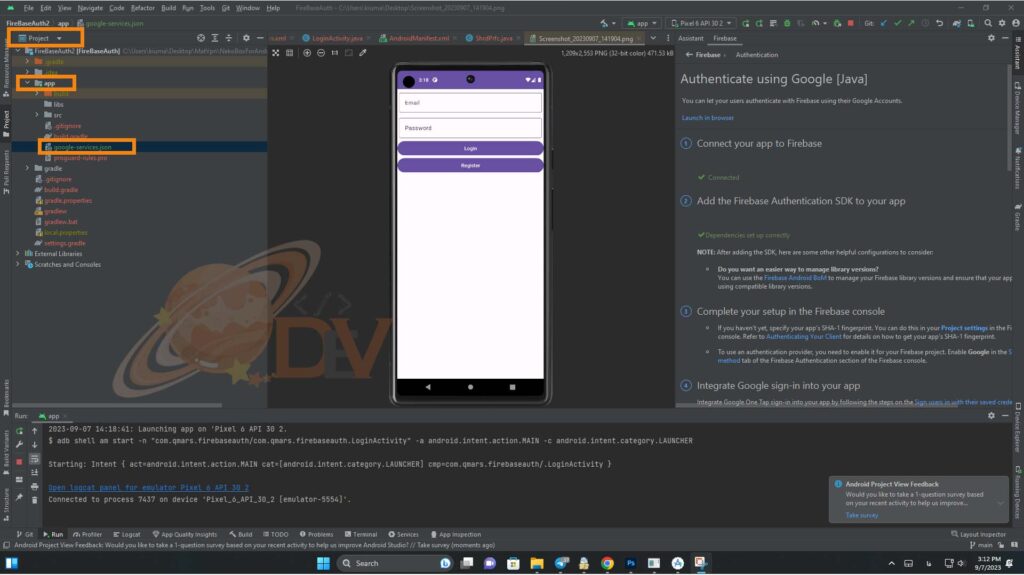
خوب بریم سراغ آموزش یه پروژه جدید ایجاد کنید بعد از ایجاد از منوی بالای صفحه بر روی Tools و سپس بر روی FireBase کلیک کنید
در پنجره باز شده بر روی Authenticate کلیک کنید طبق تصویر زیر

سپس بر روی authenticate using google (java) را بزنید
بر روی add authenticate sdk کلیک کنید و تایید بزنید تا به پروژتون اضافه بشه
خوب بریم سراغ مرحله بعد به کنسول فایربیس برید در صورتی که حساب کاربری ندارید ایجاد کنید سپس یک پروژه جدید ایجاد کنید با پکیج نیم پروژتون و فایل google-services.json را دریافت و به پروژتون اضافه کنید و به مسیر app پروژه اضافه کنید مطابق تصویر زیر
اکنون فایل build.gradle رو باز کنید و کتابخانه های زیر رو اضافه کنید
					dependencies {
    implementation 'com.google.firebase:firebase-auth:22.1.1'
    implementation 'com.google.firebase:firebase-core:21.1.1'
}
در پنل فایر بیس خود به منوی build و سپس authentication رفته بر روی get started در بالای صفحه کلیک کرده و صفحه نمایان شده بر روی email/password کلیک کنید و سپس برروی enable بر روی save کلیک کنید به اندروید استودیو برگردید و یک کلاس به اسم app از نوع اپلیکیشن درست کنید و در مانیفست نیز آدرس بدهید به تگ اپلیکیشن
وکدهای زیر در آن وارد کنید
					public class app extends Application {

    @Override
    public void onCreate() {
        super.onCreate();
        FirebaseApp.initializeApp(this);

    }
}
یک کلاس دیگر به اسم shrdprfز ایجاد کنیدو کد های زیر رو بهش وارد کنید
					public class ShrdPrfc {

    public static Context ctx;

    SharedPreferences preferences;

    public ShrdPrfc(Context context){
        preferences = context.getSharedPreferences("",Context.MODE_PRIVATE);
       ctx = context;
    }

    public void setLogin(boolean state){
        SharedPreferences.Editor editor = preferences.edit();
        editor.putBoolean("state",state);
        editor.apply();
    }

    public boolean checkLogin(){
        boolean state = preferences.getBoolean("state",false);
        return state;
    }


}
یک اکتیویتی جدید به اسم LoginActivity ایجاد کنید و کد های زیر را به آن اضافه کنید
					public class LoginActivity extends AppCompatActivity {


    TextInputEditText ed_email,ed_pass;
    Button btn_login,btn_register;
    @Override
    protected void onCreate(Bundle savedInstanceState) {
        super.onCreate(savedInstanceState);
        setContentView(R.layout.activity_login);

        ShrdPrfc shrdPrfc = new ShrdPrfc(this);

        ed_email = findViewById(R.id.ed_email);
        ed_pass = findViewById(R.id.ed_password);
        btn_login = findViewById(R.id.btn_login);
        btn_register = findViewById(R.id.btn_Register);

        FirebaseAuth mAuth = FirebaseAuth.getInstance();


        if(shrdPrfc.checkLogin()){
            startActivity(new Intent(this,MainActivity.class));
            this.finish();
        }else {

            btn_login .setOnClickListener(v -> {
                if(ed_email.getText().toString().isEmpty()){
                    ed_email.setError("enter your email...!");
                    return;
                }else if(ed_pass.getText().toString().isEmpty()){
                    ed_email.setError("enter your password...!");
                    return;
                }else {
                    mAuth.signInWithEmailAndPassword(ed_email.getText().toString(), ed_pass.getText().toString())
                            .addOnCompleteListener(this, task -> {
                                if (task.isSuccessful()) {
                                    set_user_login(shrdPrfc);
                                } else {
                                    Toast.makeText(this, "Error):", Toast.LENGTH_SHORT).show();
                                }
                            });
                }


            });

            btn_register .setOnClickListener(v -> {
                if(ed_email.getText().toString().isEmpty()){
                    ed_email.setError("enter your email...!");
                    return;
                }else if(ed_pass.getText().toString().isEmpty()){
                    ed_email.setError("enter your password...!");
                    return;
                }else {
                    mAuth.createUserWithEmailAndPassword(ed_email.getText().toString(), ed_pass.getText().toString())
                            .addOnCompleteListener(this, task -> {
                                if (task.isSuccessful()) {
                                    set_user_login(shrdPrfc);
                                } else {
                                    Toast.makeText(this, "Error):", Toast.LENGTH_SHORT).show();
                                }
                            });
                }
            });

        }


    }

    public void set_user_login(ShrdPrfc prfc){
        prfc.setLogin(true);
        startActivity(new Intent(this,MainActivity.class));
        this.finish();
    }
}
لایو لاگین را نیز باز کرده و کد های زیر را در آن وارد کنید
					<?xml version="1.0" encoding="utf-8"?>
<RelativeLayout xmlns:android="http://schemas.android.com/apk/res/android"
    xmlns:app="http://schemas.android.com/apk/res-auto"
    xmlns:tools="http://schemas.android.com/tools"
    android:layout_width="match_parent"
    android:layout_height="match_parent"
    tools:context=".LoginActivity">


    <LinearLayout
        android:layout_width="match_parent"
        android:layout_height="match_parent"
        android:orientation="vertical">

        <com.google.android.material.textfield.TextInputLayout
            android:layout_width="match_parent"
            android:layout_height="wrap_content"
            android:layout_margin="5dp"
            android:hint="Email">

            <com.google.android.material.textfield.TextInputEditText
                android:id="@+id/ed_email"
                android:layout_width="match_parent"
                android:layout_height="match_parent"/>

        </com.google.android.material.textfield.TextInputLayout>
        <com.google.android.material.textfield.TextInputLayout
            android:layout_width="match_parent"
            android:layout_height="wrap_content"
            android:layout_margin="5dp"
            android:hint="Password">

            <com.google.android.material.textfield.TextInputEditText
                android:id="@+id/ed_password"
                android:layout_width="match_parent"
                android:layout_height="match_parent"/>

        </com.google.android.material.textfield.TextInputLayout>

        <Button
            android:id="@+id/btn_login"
            android:layout_width="match_parent"
            android:layout_height="wrap_content"
            android:text="Login"/>
        <Button
            android:id="@+id/btn_Register"
            android:layout_width="match_parent"
            android:layout_height="wrap_content"
            android:text="Register"/>

    </LinearLayout>

</RelativeLayout>
مجوز اینترنت را به مانیفست اضافه کنید و کار تمومه میتونید اکنون ران بگیرید از پروژه
ممکنه بعضی جاهای آموزش براتون نامفهوم باشه و نتونسته باشید کامل پیاده کنید برای همین پیشنهاد ما دیدن ویدیو این آموزش در یوتیوبه